Free template · PDF and printable
Move-in and move-out inspection checklist (free PDF)
One room-by-room checklist for both ends of a tenancy, with a move-in column and a move-out column on every line, so the two inspections compare item by item.
Reviewed by Mark Shvaya, licensed California real estate broker (DRE #02243502), who uses ProFlow360 in a rental portfolio Mark manages
Last reviewed
Free, no email required. Letter size, prints in black and white.
Short answer
A move-in and move-out inspection checklist records the condition of every room and fixture when a resident moves in, then the same items when they leave. This free template puts both inspections on one line per item, with Good, Fair, Poor and Damaged codes, a photo number and notes, so changes are easy to see and explain.
The move-in / move-out inspection checklist
Move-in / move-out inspection checklist
Record each item at move-in, then again at move-out, against the same line.
- Property address
- Unit
- Resident(s)
- Move-in date
- Move-out date
- Inspected by
Condition: G = Good · F = Fair · P = Poor · D = Damaged. Note the photo number for every line.
| Item | Move-in | Move-out | Photo # | Notes |
|---|---|---|---|---|
| Front door, lock and deadbolt | ||||
| Doorbell and peephole | ||||
| Walls and ceiling | ||||
| Flooring | ||||
| Light fixtures and switches | ||||
| Closet doors and interior | ||||
| Smoke detector |
| Item | Move-in | Move-out | Photo # | Notes |
|---|---|---|---|---|
| Walls and ceiling | ||||
| Flooring or carpet | ||||
| Windows, screens and locks | ||||
| Blinds or window coverings | ||||
| Lights, switches and outlets | ||||
| Doors and hardware | ||||
| Baseboards and trim |
| Item | Move-in | Move-out | Photo # | Notes |
|---|---|---|---|---|
| Countertops | ||||
| Cabinets, doors and drawers | ||||
| Sink, faucet and disposal | ||||
| Range, oven and hood | ||||
| Refrigerator, inside and out | ||||
| Dishwasher | ||||
| Microwave | ||||
| Flooring | ||||
| Walls, ceiling and backsplash | ||||
| Lights and outlets |
| Item | Move-in | Move-out | Photo # | Notes |
|---|---|---|---|---|
| Toilet | ||||
| Tub or shower and surround | ||||
| Grout and caulk | ||||
| Sink, faucet and vanity | ||||
| Mirror and medicine cabinet | ||||
| Exhaust fan | ||||
| Towel bars and fixtures | ||||
| Flooring | ||||
| Walls and ceiling |
| Item | Move-in | Move-out | Photo # | Notes |
|---|---|---|---|---|
| Walls and ceiling | ||||
| Flooring or carpet | ||||
| Closet doors, rod and shelving | ||||
| Windows, screens and coverings | ||||
| Doors and hardware | ||||
| Lights and outlets | ||||
| Smoke detector |
| Item | Move-in | Move-out | Photo # | Notes |
|---|---|---|---|---|
| Washer and dryer, or hookups | ||||
| Water heater (visible condition) | ||||
| HVAC filter | ||||
| Electrical panel access |
| Item | Move-in | Move-out | Photo # | Notes |
|---|---|---|---|---|
| Front and back yard | ||||
| Fencing and gates | ||||
| Garage door and opener | ||||
| Garage floor | ||||
| Patio or balcony | ||||
| Exterior lights |
| Item | Move-in | Move-out | Photo # | Notes |
|---|---|---|---|---|
| Smoke and CO detectors tested | ||||
| Fire extinguisher, if provided | ||||
| Keys, fobs and remotes (count) | ||||
| Meter readings, if applicable |
How do you use a move-in and move-out checklist?
- Before the resident moves in, walk every room with the checklist and mark the move-in column. Photograph each line, including the ones in good condition, and write the photo number.
- Review it with the resident. Ask them to note anything they see differently and sign. Give them a copy.
- At move-out, use the same sheet. Fill the move-out column line by line, photographing the same subjects from the same spots.
- Compare the two columns. For every line that changed, record what changed, and keep the move-in and move-out photos together with any repair estimate or invoice.
Keep the completed checklist with the tenancy it belongs to, not in a general property folder. That is the difference between a record you can find in a year and one you have to reconstruct. For classifying the changes, see normal wear and tear vs damage.
What should you photograph at move-in?
Photograph every room from the doorway, then every line on the checklist. The move-in photos that matter at move-out are almost never the interesting ones: the clean carpet in the corner, the cabinet door with nothing wrong with it, the wall beside the bedroom door.
- One wide shot per room, taken from the doorway, so the room can be recognized later.
- One photo per checklist line, close enough to see the surface.
- A closer photo of anything already worn or damaged, with a note.
- Appliance interiors, under sinks, and inside closets, which are easy to skip.
Move-in · 2417 Alder Creek Way, Unit B
Template: Single family, 3 bed
- Entry & hallway4 of 4
- Living room5 of 6Required: Floor, wide from doorwayCapture
- Kitchen8 of 8
- Bedroom 14 of 4
- Bathroom6 of 6
Living room can be completed once every required shot is captured.
What does a paper checklist miss?
A paper checklist records a rating, but the rating is only as good as the photo behind it, and on paper the photos live somewhere else: a phone, a shared drive, a text thread. Eleven months later someone has to match “Living room walls: G” to the right photo from the right day.
Running the same checklist in an app keeps each photo attached to its line and keeps the capture time on the photo. At move-out, each line can then be shown beside its move-in counterpart instead of searched for.
Do this in ProFlow360
Run this checklist on iPhone, with photos on every line
ProFlow360 uses the same room-by-room structure. Capture works with no signal, and at move-out each photo sits beside its move-in match with both dates kept.
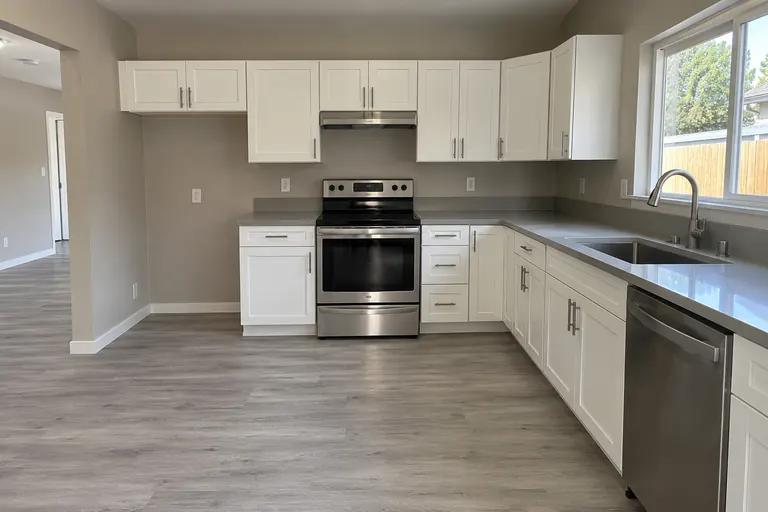
Move-in · Jul 12, 2024
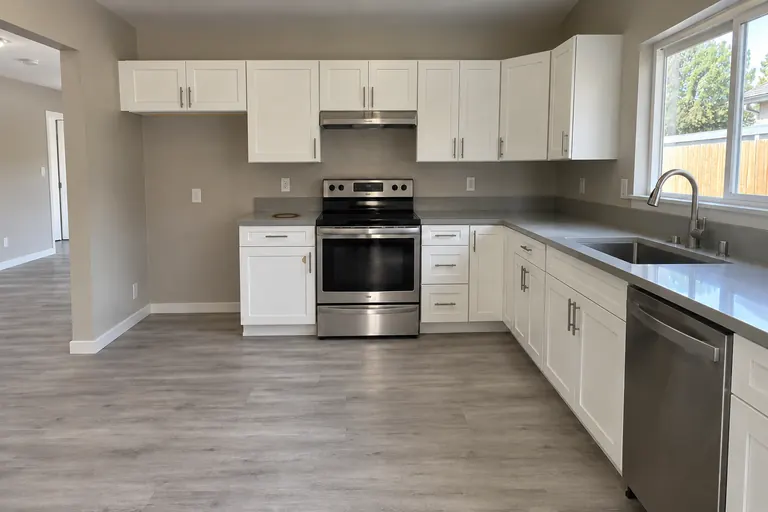
Move-out · Sep 30, 2026
Questions about this template
Who fills out the move-in inspection checklist?
Usually the property manager or leasing agent walks the unit before the resident moves in and fills it out, and the resident reviews it, adds anything they see, and signs. Some operators also send the resident a self-inspection link so their own photos are part of the record.
Can the same checklist be used for the move-out inspection?
Yes, and it should be. This checklist has a move-in column and a move-out column on the same line, so the move-out inspection compares the same items in the same order. Photographing the same subjects from the same spots makes the comparison easy to follow later.
How many photos should a move-in inspection include?
At least one wide photo of each room from the doorway, plus one photo for every line on the checklist, including the lines in good condition. The undamaged cabinet door and the clean carpet are the photos people most often wish they had at move-out.
Is a move-in checklist required by law?
Some states and cities require a written move-in condition statement or a pre-move-out inspection, and the details vary. Check the statute where the property is located and confirm with a local attorney. This template is a documentation aid, not legal advice.
What condition codes should I use?
The checklist uses Good, Fair, Poor and Damaged, which are the same four room conditions ProFlow360 records. Whatever codes you use, write a short note and a photo number for anything that is not Good.
Keep reading
Start documenting condition properly
Create an account and run your next inspection with the evidence trail already in place. No card required to start.